
My Nail Routine Arsenal: Clean-Up Supplies and Application Tips
I'm not claiming to be an expert in nail application and care, but people do often ask me what I use. This is what I've found works for me (keep in mind that I haven't done extensive head-to-head tests or anything, my picks are just from trial-and-error plus experience).
The easiest way to get better at polishing your nails is to practice! It's obnoxious getting polish all over the place at first, but the more you do it, the more you will get a feel for what works for you. For instance, I always polish my right hand first. I am right-handed, but somehow I find that polishing with my non-dominant hand first gives me overall better application - maybe it's a mental thing, but it's true!
 I also have a few things at hand to help when I do make a mess and need to clean up.
 Technique-wise I like to do the typical three-stroke application: first stroke on the middle of the nail (I place my brush near, but not at the cuticle, and lightly push it back towards the nail bed to close "the gap" without getting polish on my cuticles), second and third stroke on either side of the nail, and a quick swipe parallel to the edge of the nail to "wrap" the tips (I think this looks cleaner and prevents chipping). Try to splay your brush out wide to get the nail covered quickly and prevent dragging.
Some other quick (and probably obvious tips):
The easiest way to get better at polishing your nails is to practice! It's obnoxious getting polish all over the place at first, but the more you do it, the more you will get a feel for what works for you. For instance, I always polish my right hand first. I am right-handed, but somehow I find that polishing with my non-dominant hand first gives me overall better application - maybe it's a mental thing, but it's true!
 I also have a few things at hand to help when I do make a mess and need to clean up.
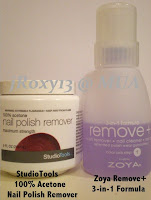
- You've seen the StudioTools 100% Acetone Nail Polish Remover tub before. Not only do I use it to remove stubborn glitter polish, I also use it as a well to dip my clean-up brushes into. I find this to be neater than pouring out a portion into a tiny cap - which can get tipped over - or dipping into a bottle - which can strip the paintbrushes of their paint and make a mess. I always use 100% acetone for clean-up; it's more efficient and since I'm not using it all over my fingers I don't worry about it being too drying. The StudioTools brand is Target-specific, but there are a few other brands that make similar tubs sold at other drugstores.
- The other remover I use is Zoya Remove+. This remover was like an epiphany when I tried it. You can get polish off your nails without your hands going as dry as the desert or your nose and brain shutting down due to the fumes! Now, I have heard that there are other acetone removers that are just as gentle and pleasant smelling as Remove+, but I'm happy sticking with it for now. It is also easily dispensed with the flipper mechanism at the bottle opening; just press down at the top with your cotton pad or felt and you're saturated - no flipping the bottle over and over (meaning less risk to knock it down for me)! Remove+ smells pleasantly of lavender and keeps my hands feeling great. I'm actually a fan of Zoya polish, but the last few times I've ordered from them their customer service has left much to be desired. However, if you follow them on Twitter (@Zoya_NailPolish) or through their blog, they do have good deals every month or so if you're willing to put up with a mad frenzy of crashing on their site from the rush, as well as slow (and sometimes rude) customer service. I usually wait until one of their promotions and then buy a big 32 fl. oz. bottle to refill my 8 fl. oz. flipper (which you can see above), vowing to never buy from them again.

- I buy felt by the yard from a craft store. It's insanely cheap and will last you forever (it doesn't matter what color you get; I usually get white or black). This makes nail polish removal much less frustrating. No cotton fibers getting caught on your cuticles or under your nails! No pads disintegrating until your fingers are the ones doing the removing! Felt is what they use in those little single-use remover packets and for good reason - they're durable and retain liquid. I like to cut them off into little 2-x-2" squares and have them at hand during clean-up to soak up excess remover from my brushes, wipe off polish from my orange stick, or do-over a whole nail.
- I use three tools for clean-up: a fine-point paintbrush, a chisel-point paintbrush, and an orange stick. Orange sticks are easily purchased at any drug store - I prefer the longer ones over the tiny stubby ones. As you can see, they have a chisel tip so they can do fine or broad work - I use them to remove any polish I may have accidentally gotten on my skin or to run at the edge of my cuticles if I accidentally flood them, wiping the polish on my felt. Once you get the hang of painting your nails, you will probably use primarily this tool. The two paintbrushes are affordable Loew-Cornell's that I got from Jo-Ann Fabric's. If you click to enlarge the picture, you can get the exact brushes. I like these specific brushes because they are not too broad, but not so precise they're worthless for clean-up; obviously, other people may have different preferences. It's also nice that their handles are plastic because if you dip varnished handles in acetone, the paint starts to come off and make a mess. [Update 2013: My current favorite brushes for cleanup are the e.l.f. Essential Concealer Brush (which retails for $1!) for bigger areas and the Chanel brush that comes with the Illusion d'Ombre shadows for work near my cuticles. The e.l.f. brush has a good stiffness to really get into dry bits of skin near the tip of my finger and remove stubborn stains. The Chanel brush is thin, long, and flexes exactly where I want it to to help me get a super thin gap near my cuticle.] Brushes are good if you make a big mess and an orange stick doesn't do sufficient clean-up. I wait until I've done all my nails to go back and use these brushes, dipped in remover and swiped to remove excess liquid; otherwise, the remover can pick up wet polish that you don't want removed, as well. I use another finger to pull back my cuticle as I do this, to ensure a nearly invisible gap. MeganChair of the NB has a great tutorial covering brush cleanup.

Some other quick (and probably obvious tips):
- Before you do your nails quickly go over your nails with some remover and wash your hands. Any dirt or oils on your nails will keep the polish from adhering well and cause quicker wear to your manicure.
- Use a glass file if you have delicate nails. This helps keep your nails stronger and helps prevent cracks or splits on the nails. I actually have very strong nails so I use a coarse-grit file to get the shape and then use a fine-grit file to seal the edge. I file at about a 45-degree angle under my nail, which helps get rid of any lingering "bits" of nail that want to stick around and snag on my clothes, leading to tears. To "seal" the edge of the nail from any splitting, I take my file at almost a 90-degree angle parallel to the edge and run it down, to close off the layers of nail from water or debris that wants to sneak in.
- Moisturize in between manicures. No one likes to look at "frazzle" or unkempt cuticles (although we will, of course)! Obviously in the winter months it's tough to control, so just always have some lotion with you and moisturize whenever you think of it. I like to have a lightweight lotion in my car or purse for when I'm doing things that require my hands not to be greasy (I like Aveeno, but I think it might just be lingering childhood affection for the scent) and a heavy-duty creme for when I'm sitting around watching TV or going to bed (I love hand cremes so I'm always trying out a new rich citrus-scented one - no go-to for me). I don't know if they're actually helpful, but my favorite cuticle cream is Burt's Bees Lemon Butter Cuticle Creme, because of the smell. [Update 2013: I don't think Burt's Bees is super effective. Although smelly and messy, I use lanolin cream (available near baby supplies in drugstores) when I'm in dire need. However, I mostly just rely on moisturizing morning and night, as well as after every time I wash my hands.] Occasionally I will have a hangnail or something where I find it's easiest to use cuticle clippers, but honestly, I think that 99% of cuticle issues can be solved by using hand creme diligently and often. Using cuticle clippers more often results in worse damage to your cuticles than leaving it alone - like popping a pimple instead of treating it!
- Use a base coat to add longevity. In addition, some nail polishes will do better with certain base coats - often B3F polishes like to have a B3F base coat; I also find that using Chanel's base coat with their polishes gives me longer wear time than using my usual CND Stickey.
- Thin coats adhere better and are less likely to bubble and peel off the nail. Lots of times it's just body chemistry reacting with formula though, I think.
- If you're doing housework or washing your hands often, you're mani's are simply not going to last as long. If you can, use gloves to help protect them from water and bumping into things.
- If you're having trouble applying polish, it may not be you! Sometimes polishes are too thick and goopy or streaky. Use nail polish thinner (not remover) to fix them up - you never need to throw away old polish!
Whew, all I have left to cover now is top coats, so the long-winded posts should be at an end soon. Hope this was useful and please leave me comments with your thoughts!

Comments
Post a Comment